EMMA: How to Set Up a New Account
Emma Account Creation
- Log in into Emma
Click on Menu (Top Right) select Sub Accounts from dropdown.
Click on Create a New Subaccount
Enter Account Name:
a. The format should be: Business Name – ESP | CategoryType | Programs (EXAMPLE: Boardwalk Billy’s – 187056 | Dining | APP/OO
CATEGORY TYPES:
a. Dining
b. Fun
c. Beauty
d. Health
e. Home
f. Services
g. Auto
h. Retail
PROGRAM TYPES:
a. APP (for app only)
b. OO (for tls oo only)
c. APP/OO (for both app and tls oo)
d. EMAIL ONLY (leave empty) - Ignore the rest. Click Save. Wait for it to create.
- Once created, Scroll down and find your newly created account (you must manually search for it, and cannot place it in the search bar)
- click on the drop down arrow for that account, and choose “View Subaccount”
- Click on the orange Account at the top right and select Account from the drop down.
- Under the Basics Tab:
a. Account Name: will be pre-loaded
b. Account Email: enter [email protected]
c. Business’s Time Zone: Select (if it is a multi-loc account, please select the time zone that most locations fall under.
d. Click Save - Skip the Additional Info Tab
- Under the Sender Info Tab:
a. Sender Name: enter business name
b. Sender Email: [email protected] (do not add any apostrophes or special characters)
c. Fill in Merchant Address Information (If it is a multi-location use 3708 Hempland Rd. Mountville PA 17554)
d. Click Save - Under the Features Tab:
a. Template Gallery – OFF
b. 24-Hour Summary – OFF
c. Save as Template – ON
d. Show Landing Pages – ON
e. Show Code Your Own – ON
f. Show Blank Template – OFF (Click Save) - Notifications: Click to turn on the 24 hour email option (It should be on and green). Enter the Maintenance Account Mangers email. Leave the Recipient field empty. – Click Save
- Skip the Custom URLS tab
- Skip the DKIM tab
Adding “[email protected]”
Go to Audience
Go to Contacts
Click on “Add a Contact”
Enter “[email protected]
Click “Save and Close”
Creating Contact Fields
Go to Audience
Go to Contact Fields
Click to Create Contact Field
- Address1
● Field Name = Address1
● Field Type = Short Answer - Address2
● Field Name = Address2
● Field Type = Short Answer - Cell-Phone
● Field Name = Cell Phone
● Field Type = Short Answer - City
● Field Name = City
● Field Type = Short Answer - Phone
● Field Name = Phone
● Field Type = Short Answer - State
● Field Name = Nothing Goes Here
● Field Type = State
● (you do not need to select a state from the drop down arrow under Preview) - Postal-Code
● Field Name = Nothing Goes Here
● Field Type = Postal Code
● (you do not need to enter a postal code into the field under Preview) - Anniversary
● Field Name = Anniversary
● Field Type = Date Picker - Birthday
● Field Name = Birthday
● Field Type = Date Picker - Primary Location (FOR MULTI LOCS SEE NEXT STEP)
● Field Name = Primary Location
● Field Type = Choose “Drop Down Menu”
● Enter the location in the text field that pops up in City, State format. If you have customers that refer to any of the locations with specific terms that you think would be best added to the customer facing sign up, please add it in parentheses at the end. This format is VERY IMPORTANT. Please do not derive from this exact structure.
o City, State (Location Name If Applicable)
o EXAMPLE: Charlotte, NC (Crown Point) - Multi Loc Primary Location
● Field Name = Primary Location
● Field Type = Choose “Drop Down Menu”
● Enter ALL locations in the text field that pops up in City, State format. If you have more than one location in the same “City, State”, please add the Street Name. (Do not include the # of the Street Address unless the number is part of the actual street name; Example: 3rd Street) If you have customers that refer to any of the locations with specific terms that you think would be best added to the customer facing sign up, please add it in parentheses at the end. This format is VERY IMPORTANT. Please do not derive from this exact structure.
o City, State – Street Name (Location Name If Applicable)
o EXAMPLE: Charlotte, NC – Sardis Rd. (Crown Point)
- Local Flavor Acquisition
● Field Name = Localflavor Acquisition
● Field Type = Date Picker - Zuppler Acquisition
● Field Name = Zuppler Acquisition
● Field Type = Date Picker - Menufy Acquisition
● Field Name = Menufy Acquisition
● Field Type = Date Picker - Merchant Supplied Acquisition
● Field Name = Online Ordering Acquisition
● Field Type = Date Picker - Facebook Acquisition
● Field Name = Facebook Acquisition
● Field Type = Date Picker - TLS App Acquisition
● Field Name = TLS App Acquisition
● Field Type = Date Picker - Welcome Email
• Field Name =Welcome Email
• Field Type = Date Picker
Creating Groups
- Go to Audience
- Select Groups
- Create the following Groups
• App Sign Up Form
• Local Flavor
• Merchant Supplied
• Sign Up Cards
• TLS App
• Website Sign Up Form
Creating List Segments
Go to Audience
Select Segments
Create the following Segments (Keep scrolling for instructions on how to set up each of these below)
• Main List
• Merchant Export (LF Excluded)
• LF ONLY Subscribers
• Unengaged – 90 Days
• Audience Growth – 90 Days
• Limbo Check
• Location – Empty
• Name: Birthday – Provided
• Name: Birthday – Empty
• Name: Anniversary – Provided
• Name: Anniversary – Empty
MAIN LIST:
Click Create a Segment
Name Segment = Main List
Segment Type = Contact Since
Condition = Is Not Empty
Save
EXPORT – NO LOCAL FLAVOR
Segment Name: Export (LF Excluded)
Segment Type: Group
Condition: In
Third Field: TLS App
Click: OR
Segment Type: Group
Condition: In
Third Field: Merchant Supplied
Click: OR
Segment Type: Group
Condition: In
Third Field: App Sign Up Form
Click: OR
Segment Type: Group
Condition: In
Third Field: Website Sign Up Form
Click: OR
Segment Type: Group
Condition: In
Third Field: Sign Up Cards
(continue doing this until you selected every group that is NOT Local Flavor, Limbo, or Test Group)
Save
LF ONLY SUBSCRIBERS:
Segment Name: Local Flavor ONLY
Segment Type: Group
Condition: in Local Flavor
Click: AND
Segment Type: Group
Condition: not in TLS
Click: AND
Segment Type: Group
Condition: not in TLS App
Click: AND
(continue with “Group Not in XX” until you select all that are NOT Local Flavor)
Save
UNENGAGED – 90 DAYS:
Segment Name: Unengaged – 90 Days
Segment Type: Have not Opened
Second Field: Any Mailing
Third Field: In the Last
Fourth Field: Select 90
Fifth Field: Select “Days”
Save
AUDIENCE GROWTH – 90 DAYS:
Segment Name: Audience Growth – 90 Days
Segment Type: Contact Since
Condition: (choose the last 90 days as your time frame)
Save
LIMBO CHECK:
Click to Create a Segment
Name Segment = Limbo Check
Segment Type = Group
Condition = In
Select a Group = Limbo (not in any group)
Save
BIRTHDAY – ACTIVE:
Name: Birthday – Active
Segment Type: Birthday
Condition: Is not empty
Save
BIRTHDAY – EMPTY:
Name: Birthday – Empty
Segment Type: Birthday
Condition: Is empty
Save
ANNIVERSARY – ACTIVE:
Name: Anniversary – Active
Segment Type: Anniversary
Condition: Is not empty
Save
ANNIVERSARY – EMPTY:
Name: Anniversary – Empty
Segment Type: Anniversary
Condition: Is empty
Save
Creating the Default Sign Up Form
Go to Audience
Go to Forms
Click on the Sign Up Tab
Click on “Your Default Signup Form”
ABOUT THIS SIGNUP FORM SECTION:
- In the top box/section UNCHECK THE BOX that says “Enable reCAPTCHA”
- Click SAVE
SIGNUP STAGES SECTION:
- Verbiage: To sign up to receive our emails or update your current subscription, please fill in the following fields and hit submit.
- Font: Arial
- Justification: Centered
- Click SAVE
CONTACT FIELD VISIBILITY:
- Uncheck the “hide” check mark on the following
• Birthday
• Anniversary
• First Name
• Last Name
• Address1
• Address2
• City
• State
• Postal Code
• Phone
IF IT IS A MULTI LOCATION ACCOUNT: Please UNCHECK the PRIMARY LOCATION contact field so that it is VISIBLE and CHECK the box for REQUIRED to make it MANDATORY.
SORT ORDER:
Edit the numbers in the order column next to each contact field to place each contact field in the same sort order as written above.
2. Preferred format HTML
3. Email
4. Primary Location
5. Birthday
6. Anniversary
7. First Name
8. Last Name
9. Address1
10. Address2
11. City
12. State
13. Postal Code
14. Phone
PRIVACY CONSENT OPTIONS SECTION:
- Uncheck the “hide” check mark for Subscriber Consent
- Uncheck the “hide” check mark and check the “required” check mark for “I consent to receiving email communications”
CLICK SAVE BEFORE YOU HIT PREVIEW
PREVIEW:
• Click preview to view the form
• Adjust as needed
• Click Save after adjustments are made
• Preview Again
• Repeat until correct
CONFIRMATION EMAIL TAB WITHIN THE SIGNUP STAGES SECTION:
• Go to the “Confirmation Email” tab at the top.
• Uncheck the box next to “Send Confirmation?”
• Click Save
Creating App AND Website Sign Up Form (Please note there are instructions below for both the OLD process and the NEW process – please use whatever instructions you need)
OLD PROCESS:
Go to Audience
Go to Forms
Click on the Sign Up Tab
Click to Create a New Sign Up Form
Name: App Sign Up Form (or) Website Sign Up Form
ABOUT THIS SIGNUP FORM SECTION:
- In the top box/section UNCHECK THE BOX that says “Enable reCAPTCHA”
- Click SAVE
SIGNUP STAGES SECTION:
- Uncheck the “hide” check mark on the following
• Birthday
• Anniversary
• First Name
• Last Name
• Address1
• Address2
• City
• State
• Postal Code
• Phone
- Verbiage: To sign up to receive our emails or update your current subscription, please fill in the following fields and hit submit.
- Font: Arial
- Justification: Centered
- Click SAVE
NEW PROCESS:
Go to the Audience Tab
Select Forms on the left hand menu
Click: Create a New Form
Choose: Build a Regular Form
Form Name: App Signup Form OR Website Signup Form
Click: Next
Choose: Add new subscribers to one (or more) of my groups
Select Group: App Signup Form OR Website Signup Form
Click: Next
Adjust/Center Text: To sign up to receive our emails, or update your current subscription, fill in the following fields and hit submit. Thanks, and welcome!
Content Options: Leave Alone
• Form Message: ON
• Form Image: OFF
Privacy Options: Adjust
• Email Consent: ON
• Tracking Consent: OFF
• Privacy Terms: OFF
• reCaptcha: OFF
TO ADD FIELDS TO THE FORM:
Click: Add Object
Click: Add Field
Choose: Select from your current fields
Select a Field: (see below for order of fields to add)
Click: Add Field
(Repeat with the following fields in this order until complete)
- Primary Location (ONLY ADD IF IT IS A MULTI LOCATION ACCOUNT – if/once you’ve added the field, you need to hover over it and check the box to make it required)
- Birthday
- Anniversary
- First Name
- Last Name
- Address 1
- Address 2
- City
- State
- Postal Code
- Phone
Click: Next
Uncheck the Box: Send a confirmation email after signing up
Click: Next
Click: Publish (if you want to share the form with an OB, or a MAM, you can copy the URL, if you do not need to, you can simply “x” out of the pop up box)
Creating the Default Coupon Template
Go to Campaigns
Click on Landing Pages
Create a new Landing Page
SEE VISUAL FOR EXAMPLE:
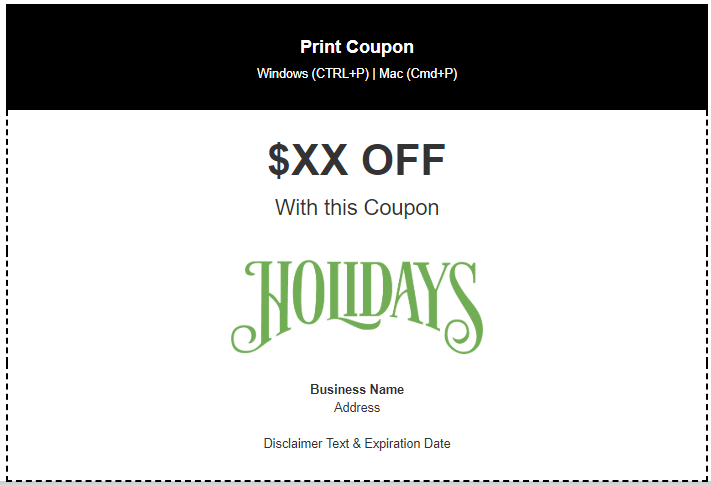
Rename the Landing Page: Default Coupon Template
Change the Page Background Color to White
Change the Column from 2 to 1
Delete all the pre-loaded content
Insert the following Sections in this order:
Text Box
Text Box
Image
Text Box
FIRST TEXT BOX:
Print Coupon (Centered, Bold, 20px, White)
Windows (CTRL+P) | Mac (Cmd+P) (Centered, NOT BOLD, 14px, White)
Settings:
Background: Black
Margin: Top 0 Right 10 Bottom 0 Left 10
Padding: Top 20 Right 40 Bottom 20 Left 40
SECOND TEXT BOX:
$XX OFF (Centered, Bold, 48px, Black)
Any Purchase of $ or More (Centered, NOT BOLD, 24px, Black)
Settings:
Background: White
Margin: Top 0 Right 10 Bottom 0 Left 10
Padding: Top 20 Right 40 Bottom 20 Left 40
Border: DASHED | Top 0 Right 2 Bottom 0 Left 2
THIRD IMAGE BOX:
Add Logo (Adjust Size as Needed)
Settings:
Background: White
Margin: Top 0 Right 10 Bottom 0 Left 10
Padding: Top 0 Right 0 Bottom 0 Left 0
Border: DASHED | Top 0 Right 2 Bottom 0 Left 2
FOURTH TEXT BOX:
Business Name (Centered, Bold, 16px, Black)
Address (Centered, NOT BOLD, 16px, Black)
(Inert Space)
With this coupon. Not valid with other offers. Expires X/X/XX (Centered, NOT BOLD, 16px, Black)
Settings:
Background: White
Margin: Top 0 Right 10 Bottom 0 Left 10
Padding: Top 20 Right 40 Bottom 20 Left 40
Border: DASHED | Top 0 Right 2 Bottom 2 Left 2